- Set the Stage to best showoff the fantastic furniture choice you’ve made.
- Clean. Everything looks better when the area is dusted, fluffed straightened, smoothed, vacuumed, uncluttered.
- Accessorize. Just like getting ready to go out for the evening, decorative baubles make a sofa, table, bed feel pretty.
- Baubles might include: throw pillows in a coordinating color on a sofa, beautiful sheets on a bed, a centerpiece on a table.
- Balance. Like wine with dinner, the right pairings make or break the meal. Where possible, pair your new furniture with correlating pieces you own. For example,
- Sofas look nice with coffee tables, end tables, lamps, area rugs, wall art, table art and coffee table books.
- Dining tables look nice with chairs, a centerpiece, art on the wall
- Beds look good with voluminous bedding like a goose down duvet with an elegantly simple cover, 4-6 pillows of varying sizes, nightstands, lamps.
- Infuse with life. Perhaps nothing brings an area to life more simply than a living plant. Alternatively, cut flowers.
- PRO TIP: A few, well paired statement pieces look nicer in pictures than a bunch of small tchotchkes.
- Things to avoid: busy bedding like quilts or knitted throws that are outdated design ideas in 2021, worn out accessories like old flat throw pillows, plastic plants, dishes on the table like you’d see in real estate home staging, magazines, and all things old, ratty, and out of step with your modern new furniture. Of course, if you are a gifted interior designer, you will know where and how to break this rule to great effect so take this suggestion with a grain of salt. Trust your instincts about what looks great.
-
Set the mood.
- Lighting is everything to a camera. Daylight is everything for free. If you don’t own professional film lighting (and why would you?) one way of getting free professional lighting is to engage the sun. Think about the best time of day where the most daylight comes in thru a window and makes your new furniture pop. PRO TIP: If you have a white towel or sheet lying around, and a friend to help you or a timer on your camera, someone can hold the sheet/towel up in a way that bounces the light coming thru a window back onto your furniture. Try it. It can be amazing and its totally free. [Hint: don’t use colored sheets for this hack because the sheet will bounce only the color back on your furniture and colored light will change the way your new piece looks.]
- Set yourself.
- This means to get low. If you’ve ever looked at professional photos of furniture or interior design websites, you’ll notice that the camera isn’t shooting from eye level. Here are some guidelines for how low:
- Beds: shoot from 3 feet above the floor.
- Living rooms: shoot from 3-4 feet above the floor
- Dining rooms: shoot about 4 feet above the floor
- Set the scope.
- Photographing furniture is different than shooting an entire home or room, like you’ll see in real estate sales. You don’t need to show the whole room or how rooms connect to one another. Keep the scope of your images tighter than that.
- PRO TIP: You don’t even have to show the entire piece of furniture you just bought. Leaving some of it to the imagination can create a very artistic composition in photos.
- Set the lens.
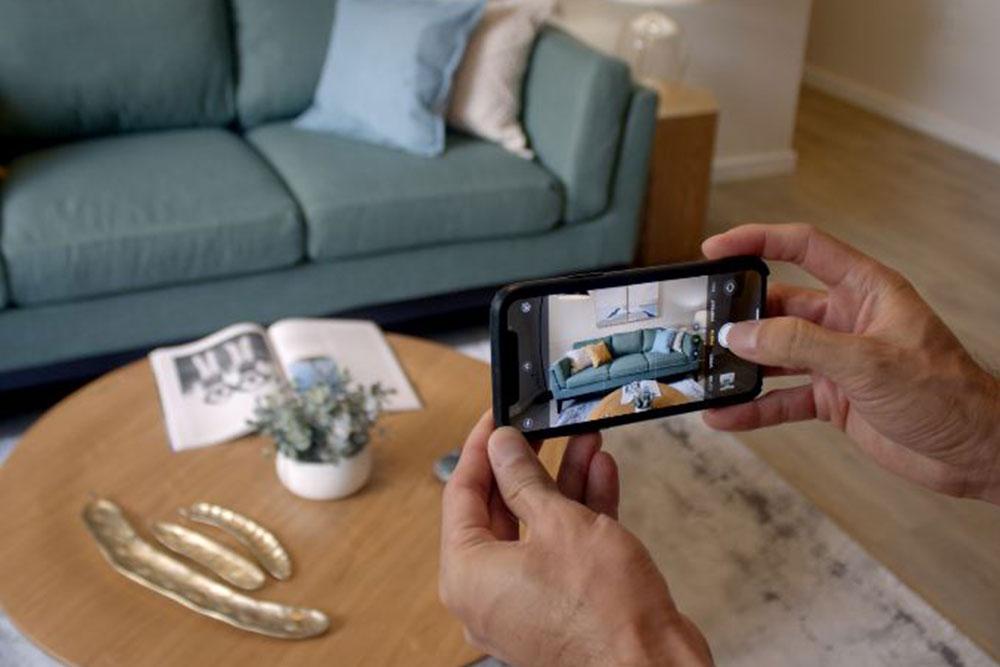
- For iPhone 11/12 Pro, Plus, & Max: for the most recent iPhones with 3 lenses, if you can get enough space between the phone and your furniture, use the 2x lens. This lens is set to mimic how the human eye sees and it makes for a lovely way to display your furniture for others.
- For other types of phones, use the lens that is the least wide-angle. Said another way, use the lens that is the most telephoto.
- Set your exposure.
- For most cell phone cameras, simply tapping the screen will change the exposure. Tap different areas on the screen (light, medium, & dark) to see which give your photo and your furniture its best look.
- Level the phone.
- This literally means to hold your phone perpendicular to the ground…as if you were trying to stand the phone on its skinny edge. Furniture photographs differently from faces. Many people today hold their phones up high and shoot down at their face when taking a selfie because that is a flattering angle. Your furniture’s most flattering angle is “straight on” and 6-18” above the main flat surface (the sofa’s seat, the table’s top, the bed’s sleeping surface). Trying different heights above the main surface before venturing into off-angle images.
- Snap away.
- Again, just like with selfies, taking several images will give you options for choosing the best one. And the shifts you make between images don’t have to be big to make a big difference. 18” to the left or right, 6” up or down, 1’ forward or back, that’s all it takes sometimes to make a pretty good image into a show stopper.
-
Remember: keep your phone parallel to the ground…at least at first.
- Have fun.
- Try different furniture arrangements, different accessories. You may just find that you’ve created a masterpiece or new design for your home in the process.
Our request of you: skip the filters. If you are active on social media, you may be very familiar with the filters available on some platforms. Most are designed to make people look better and aren’t about showing off how amazing things look naturally. Your star furniture is brand new and will never look better so we’d like you to just let it shine in the best lighting the way it does naturally.
SUMMARY:- CLEAN the area around the furniture, even windows, if necessary.
- PLACEMENT in a natural arrangement with other furniture and uncomplicated decorative items makes good sense.
- LIGHT with plenty of lighting, especially daylight/sunlight. Your camera will thank you.
- GET LOW.
- GET CLOSE.
- USE THE NARROWEST LENS you have on your phone (no wide-angle shots, when possible)
- SET THE RIGHT EXPOSURE, not too dark, not too bright
- LEVEL your phone. Hold it perpendicular to the ground.
- TAKE SEVERAL PICTURES from differing positions, re-leveling the phone each time.
- DON’T APPLY FILTERS.

Leave a comment
All comments are moderated before being published.
This site is protected by hCaptcha and the hCaptcha Privacy Policy and Terms of Service apply.